|
When you get a trailer or other RV, you find things that you would like to modify. We call them mods. So here are our first batch of mods to our Escape trailer. 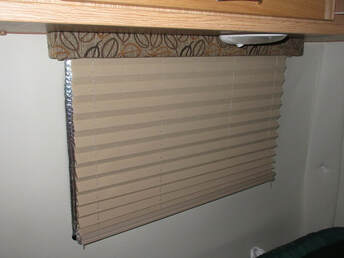 Reflectix is foil backed insulation that comes in various shapes and sizes. We had bought some before to use to block sunlight from entering our old trailer. We just hung it up over the back windows using some makeshift clamps. Our new trailer has no exterior rain gutters to use for clips (another possible mod??). So we cut the reflectix to fit between the windows and the built-in shades to block the sun. It works great to make it dark wven when the sun comes up so early as it does this time of year. 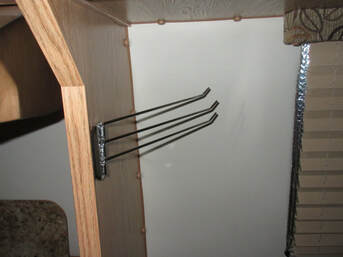 We bought a set of towel racks that hang over doors which provided a good way to hang our bath towels and wash cloths, but the one we got for the dish towels was not working for us, so we got a three bar towel rack like we had in our vintage trailer, and we expect it will do a much better job for us. 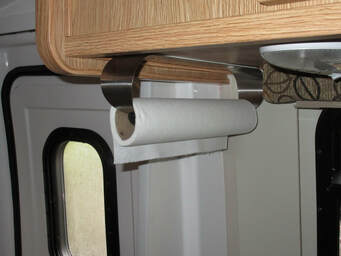 You gotta have a paper towel rack, don't you? We looked at many possibilities, and found this one at Bed Bath and Beyond. Several others have also used this one as we saw in the Escape Trailer Forum, where we also got most of the ideas for mods that you see here. It is held in place with double sticky tape and so far, this is holding up fine. We learned that the brand of paper towels matters. Most paper towels will unroll while you travel if not constrained, except for Bounty. They don't unroll so that is what we use always, now that we learned this the hard way. 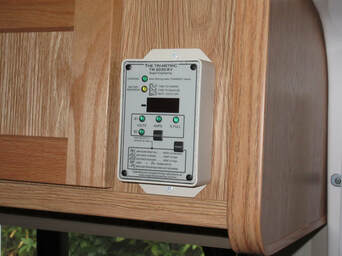 When we got our trailer, I had read about a number of issues that others have had with their trailers, and one issue is to be sure that you are properly managing your 12 volt batteries. You can use a simple voltmeter, but I decided that more is better, so I wanted a Tri-Metric battery monitor whicj provides more information than you can possibly use, but some information is really useful. The Tri-Metric measures the current going in and out of the battery which gives a better indicator than just voltage would do as to how much capacity is really left. I asked the Escape factory to install it, but they declined. They said they would prewire for it if I supplied the wiring. So I ordered the monitor and wire kit and had it shipped to the factory, where they installed the wiring. Nothing was connected. I had to install the battery shunt and connections to make it work. So far, I can't say I have a lot more information that I needed, but at least I can say that on our first trips which included 5 nights off the grid, we didn't drop below 95% capacity. 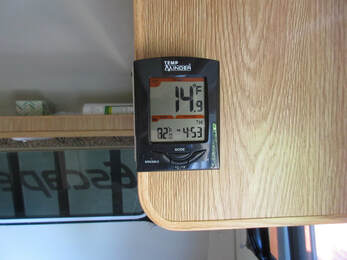 There has been a LOT of discussion on the Escape Trailer Forum about the capability of the refrigerator to be adequate for camping needs. Some have gone to great lengths to modify the space behind the refrigerator to optimize the cooling air flow and other mods. I haven't done that yet, as we have very little experience with how it really performs. We did have our Klondike bars melt in the freezer when we also put some freezer packs in there, too, for refreezing. I also wanted to know what the temperature of the trailer and the area around it are, so I got a wireless thermometer that supports 3 remotes. I put one in the front of the trailer next to the propane bottles, and then put one in the refrigerator and one in the freezer. I have been testing the last few days as it has been in the 80s here. So far, it has barely been OK. The photo shows the current inside and freezer temps. I'll keep checking. 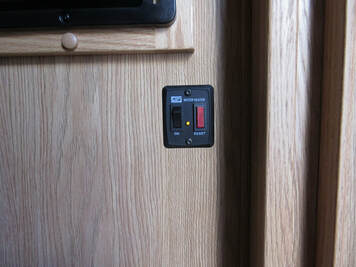 The hot water heater is a great addition to the trailer. Before this, we had to heat any water on the stove, which is fine for dishwashing but not so good for showering. It comes standard on the Escape so no mod needed there. However, the standard on-off switch has an indicator light that shows if the burner fails to ignite. This is useful, of course, but we found you could leave the heater on all the time and not realize it as there is no indicator that it is on and functioning. One night, I heard a whoosh sound and knew that I had failed to switch it off, which just wastes propane. We found that we can turn it on in the morning and have hot water for dishwashing, and then turn it off until dinner time or shower time, whichever comes first. I followed the advice in the forum and added an LED pilot light to show it is switched on. I got an amber one as the fault light is red, but the amber light is difficult to see in sunlight, so I will replace it with a red one when I make my next Amazon order, which provided a good source for this pilot light. 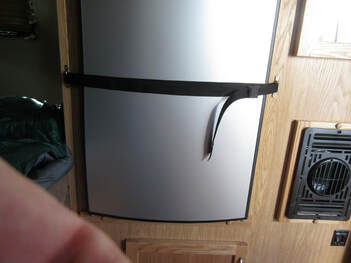 Others have told us that it is good to put a strap in front of the refrigerator so it doesn't come open while traveling. Imagine the mess of a jar of mayo hitting the floor and opening. So we got a strap and some footman loops which I mounted on either side of the refrigerator. This was the second order of footman loops we got. The first were "candy orange liquor" color which we thought would be colored similar to the paneling, and they are, but the other cabinet handles are stainless steel, so we decided not to use them where they wouldn't look as good. Actually, Jennifer made this decision. They were functional so I was happy, but she wanted a better look. I admit they do look better. And while we were at it, we also got the strap that slips easily through the loops. 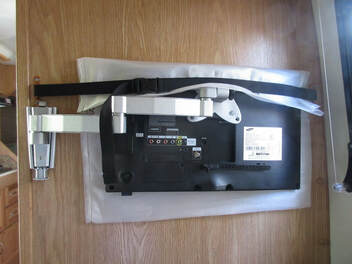 We used the original loops and straps we got to secure the television. It is on a swing arm and we found there was no lock to keep it from swinging when we traveled. We were concerned that the TV could get damaged, so I added the loops and strap to hold the TV in place while moving. Jennifer made a bag to go over the TV while traveling so it blends in better with the decor, not shown in this photo. We also found that the TV was tilted when the arm is extended, so I added a wood wedge to level the TV. 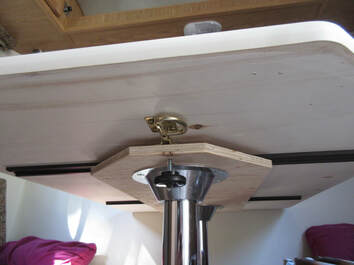 The dining table has a knob that you turn to lock it while traveling but this knob just digs into the wood undersurface of the table. Sooner or later, it might cause some damage. Well, probably not, but it seemed so inelegant. So I added a bunk latch that keeps the table centered while traveling. I also learned about this through the Escape trailer forum. This photo shows it mounted under that table in its latched position. Now we only need to remember to use it before hitting the road. 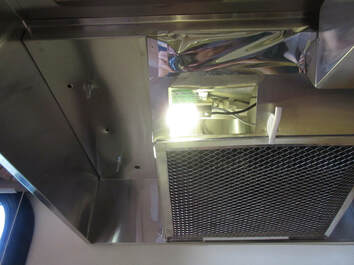 The range hood has a light but it is the one incandescent light in the trailer. All the others are LED which is great for battery life. Not only is it incandescent but it is dim. Others have found an LED replacement. I went to our local RV dealer, and they had a direct replacement. I tried it but it was about as bright as the original bulb. The LEDS were mounted around it, so most of them shined in some other direction than down. I found one that could be mounted so they all shined down. I mounted it and found that about half of them are hidden by the hood. And I noticed that the new bulb is not as secure in the socket as the old one. We'll see if it works and stays in place. If not, I will have to take the thing out and mount it in a better way. I had to wedge a small piece of foam between the bulb and the hood to keep it secure.
0 Comments
Your comment will be posted after it is approved.
Leave a Reply. |
Our EscapeRetirement is great. We bought a travel trailer and are exploring National Parks. (Actually, we bought one and sold it and bought a second one better suited to us. It happens...) And I have time to do some woodworking projects and things around the house. And now I have gotten interested in ham radio so there goes any free time. Archives
July 2015
Categories |
 RSS Feed
Copyright © 2023 by Dornbush Web Design